
To work up to a handstand, start by strengthening your core, practicing against a wall, and gradually increasing your balance and strength.
Preparing The Body
To successfully perform a handstand, it’s crucial to prepare your body beforehand. This involves building core strength and improving shoulder mobility, both of which are fundamental for achieving and maintaining the proper alignment needed for a stable handstand position. In this article, we will explore practical ways to work up to a handstand by focusing on these two key elements: building core strength and improving shoulder mobility.
Building Core Strength
A strong core is the foundation of a handstand. It provides stability and control, allowing you to balance in an inverted position with ease. Here are some exercises you can incorporate into your training routine to build core strength:
- Plank variations: Planks engage the entire core, including the abs, obliques, and lower back. Try adding side planks, forearm planks, or elevated planks to your workout routine to challenge your core from different angles.
- Hollow body holds: Lie on your back with your arms overhead and legs straight out. Engage your core and lift your shoulders and legs off the ground, creating a “hollow” position. Hold this position for as long as you can, focusing on maintaining tension in your core.
- Leg raises: Hanging leg raises target the lower abs and hip flexors, which are essential for maintaining balance during a handstand. Start by hanging from a pull-up bar and gradually raising your legs until they are parallel to the ground.
Improving Shoulder Mobility
Proper shoulder mobility is crucial for executing a handstand safely and effectively. Restricted shoulder mobility can hinder your ability to get into a straight-line position, putting unnecessary strain on the wrists and increasing the risk of injury. Incorporate the following exercises into your routine to improve shoulder mobility:
- Shoulder stretches: Perform stretches that target the shoulders to increase flexibility. Examples include shoulder rolls, arm circles, and doorway stretches.
- Pike push-ups: This exercise mimics the handstand position and requires you to engage your shoulders as you lower and push yourself back up. Start in a downward dog position with your hips high in the air and your heels reaching toward the ground. Bend your elbows and lower your head towards the ground, then push back up to the starting position.
- Wall slides: Stand with your back against a wall and your arms extended overhead. Slowly slide your arms down the wall while keeping your back in contact with it. This exercise helps to strengthen the muscles responsible for maintaining proper shoulder alignment.
By incorporating these exercises into your training routine, you’ll gradually build the necessary core strength and improve your shoulder mobility to work up to a handstand. Remember to always listen to your body and progress at your own pace. With consistent practice and patience, you’ll be well on your way to mastering this impressive inversion!
Developing Balance And Coordination
Mastering a handstand requires not only strength in your upper body but also balance and coordination. Developing these skills is crucial to achieving a successful handstand. By focusing on specific exercises and techniques, you can gradually work up to this impressive inversion. Let’s explore some effective methods to enhance your balance and coordination.
Wall-assisted Handstand
The wall-assisted handstand is an excellent way to work on your balance and build the necessary strength. Start by facing a wall and placing your hands on the floor, slightly wider than shoulder-width apart. Kick up one leg, allowing the wall to support your weight as you lift your other leg. Keep your core engaged and focus on maintaining a straight line from your wrists to your hips. This position will help you develop the balance needed for a freestanding handstand.
Using Props For Stability
Props can be incredibly helpful for developing balance and coordination. Consider using yoga blocks or parallettes to provide stability and support during your handstand practice. Placing the blocks under your hands can elevate them, reducing the distance between your hands and the floor. This encourages proper alignment and helps you find your balance. Likewise, parallettes allow for greater control and stability as you work on your handstand technique.
Another valuable prop is the yoga wheel, which can help you refine your balance and coordination. Placing the wheel against a wall, position your hands on the outer edges and walk your feet up the wall, allowing the wheel to support your weight. This prop helps train your body to find balance and adjust to the inverted position.
Incorporating these props into your handstand practice will not only improve your balance and coordination but also provide additional support, giving you the confidence to transition to a full handstand gradually.
Progressing To A Freestanding Handstand
FreestandingFreestanding
Mastering a freestanding handstand requires practice, strength, and body awareness. Once you’ve developed a solid foundation in the basic handstand, it’s time to progress to a freestanding handstand. In this section, we will explore two effective methods: the kick-up method and tuck-handstand practice. With consistent effort and these techniques, you’ll be well on your way to achieving a perfect freestanding handstand.
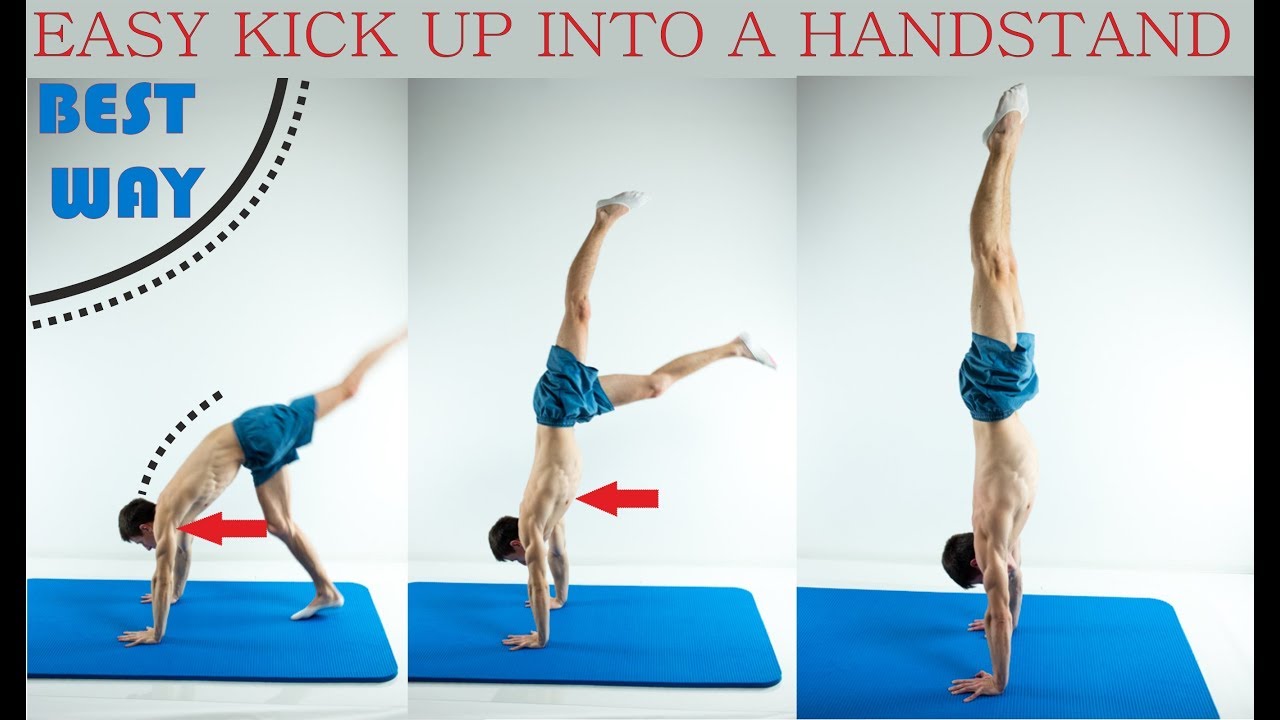
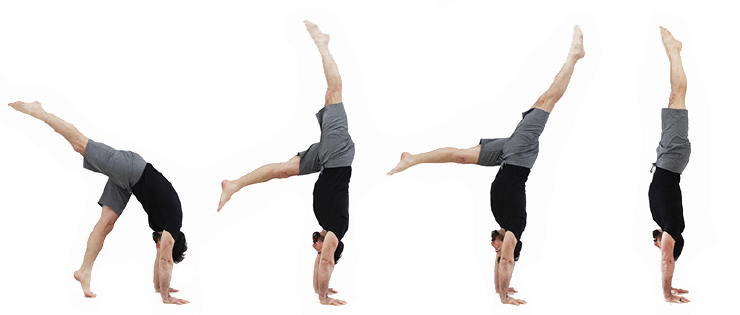
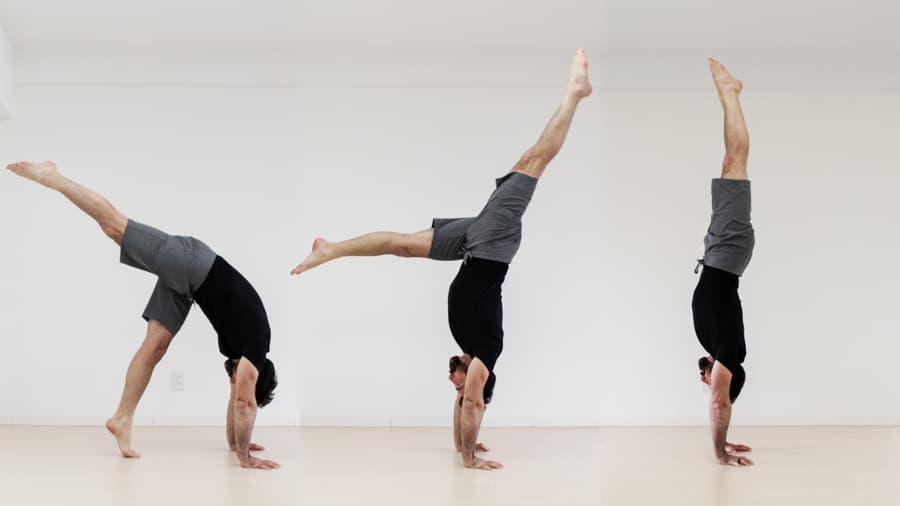
Kick-up Method
The kick-up method is a popular way to transition from a supported handstand to a freestanding handstand. This technique involves using your legs to generate upward momentum to lift your body into a handstand position. To execute the Kick-Up method:
- Start by positioning yourself in a kneeling position, with your hands placed shoulder-width apart on the ground.
- Lean forward, placing the majority of your weight on your hands.
- Engage your core muscles and kick one leg up towards the ceiling.
- Simultaneously push off with your opposite leg, using your momentum to lift your body into a vertical position.
- Focus on maintaining a straight line from your wrists to your shoulders and hips.
- Practice this kick-up motion repeatedly, gradually increasing the height and duration of your handstand.
Tuck Handstand Practice
Tuck Handstand Practice is an excellent way to develop the necessary strength and balance required for a freestanding handstand. This exercise involves tucking your knees into your chest while in a handstand position. Here’s how to start:
- Begin by kicking up into a handstand against a stable surface such as a wall.
- Slowly bend your knees and bring them towards your chest, tucking them tightly.
- Focus on engaging your core muscles to maintain your balance and control.
- Hold the tuck position for several seconds, gradually increasing the duration as your strength improves.
- Extend your legs back into the straight handstand position and lower them down to the ground.
- Repeat this tuck-handstand practice multiple times, aiming to improve your balance and control with each repetition.
Progressing to a freestanding handstand takes time and consistency. Practice the Kick-Up method and the tuck-handstand. Practice regularly to improve your strength, balance, and body awareness. Remember to prioritize safety and listen to your body throughout your handstand journey. Happy practicing!
Frequently Asked Questions On Ways To Work Up To Handstand
How Do You Build Strength For A Handstand?
To build strength for a handstand, focus on exercises that target your core, shoulders, and wrists. Try planks, push-ups, shoulder presses, and wrist stretches. Consistency and gradual progression are essential, so start with modified variations and gradually increase difficulty.
What Exercises Help You Do Handstands?
Exercises that can assist in achieving a handstand include yoga poses like downward dog and plank, strengtheners like push-ups and shoulder presses, and core exercises such as hollow body holds and forearm planks.
What Is The Best Way To Learn A Handstand?
To learn a handstand effectively, start by building core and shoulder strength. Practice against a wall for support, gradually working towards balance and stability. Over time, try practicing without the support of the wall. Consistent practice and proper form will help you master the handstand.
How Do You Transition To Handstand?
To transition into a handstand, start by standing with your feet shoulder-width apart. Then, place your hands on the floor in front of you, fingers pointing forward. Walk your feet towards your hands, lifting one leg at a time.
Keep your core engaged and gradually shift your weight onto your hands. Practice against a wall for support until you can balance on your own.
Conclusion
To sum up, mastering the handstand may seem daunting, but with consistent practice and determination, it is achievable for anyone. By focusing on building strength, improving balance, and progressing gradually, you can work your way up to a confident and stable handstand.
Remember to listen to your body, take breaks when needed, and always prioritize safety. So, don’t give up; keep practicing and soon you’ll be enjoying the upside-down world of handstands.
